使用 Claude 修复 eMachines EL1200 主板 BIOS 漏洞
文章背景与核心概要
在这篇技术文章中,作者分享了如何利用人工智能(Claude Code)在短短几分钟内解决一个困扰了长达 7 年的硬件谜题。早期 eMachines EL1200 主板(官方标称最大支持 4GB 内存)在插满 8GB 内存时虽然能够正常引导 Linux 系统,但一旦尝试进入 BIOS 设置界面就会导致系统死机。通过向 Claude 提供 BIOS 镜像并进行迭代反馈,AI 成功诊断出问题根源在于底层 awardext.rom 代码在处理内存字符串转换时触发了陈旧的 8 位整数溢出错误(即试图在 8 位寄存器中存入大于 255 的商)。
更令人惊叹的是,Claude 不仅找出了 Bug,还编写了自己的压缩工具来安全地修改二进制文件,从而绕过了模块偏移导致的死机问题。经过硬件层面的外部烧录与调试恢复,这台老旧设备最终成功在 8GB 内存下运行,并且能够完美访问完整的 BIOS 设置。本文生动地展示了 AI 在逆向工程、底层固件调试以及老旧硬件“复活”方面的巨大潜力。
将老旧硬件推向极限
I’m no stranger to pushing hardware past its limits. For example, seven years ago, I tracked down an issue that prevented 16 GB of RAM being used in a motherboard that only supported 8. It ended up being a one-line GRUB hack to fix one of the ACPI tables that was mistakenly overlapping a PCI memory region with the RAM region and causing Windows to bluescreen.
我对把硬件性能压榨到极限并不陌生。例如,七年前,我曾排查过一个故障:在一块只官方支持 8GB 内存的主板上阻止使用 16GB 内存的问题。最终的解决方案是一行简单的 GRUB 补丁,用来修复一个 ACPI 表,该表错误地将 PCI 内存区域与 RAM 区域重叠,从而导致 Windows 蓝屏。
Around the same timeframe, I began cobbling together another computer using a motherboard from an eMachines EL1200. The EL1200 was a cheap machine that came out in 2008. I found the motherboard on eBay for next to nothing, and it was also easy to find an Athlon X2 4850e to go with it. This particular motherboard only officially supports 2 GB of RAM in each of its two slots for a total of 4 GB, but I knew that 4 GB DDR2 sticks existed, so I went ahead and tried to put 8 GB in it. Why not? They were easy to find and inexpensive.
大约在同一时期,我开始用一块 eMachines EL1200 的主板拼凑另一台电脑。EL1200 是 2008 年推出的一款廉价机器。我在 eBay 上几乎没花什么钱就买下了这块主板,并且很容易就找到了一颗与之搭配的 Athlon X2 4850e 处理器。这块特定的主板每个插槽官方仅支持 2GB 内存,总共 4GB,但我知道市面上有 4GB 的 DDR2 内存条,于是我决定尝试塞进去 8GB。为什么不呢?它们既好找又便宜。
The 8 GB of RAM worked perfectly fine and I was able to boot into Linux. This honestly didn’t surprise me too much. I ran memory tests and they all came back perfect. The computer worked great with 8 GB of RAM.
8GB 的内存工作得非常完美,我也成功引导进入了 Linux。老实说,这并没有让我感到太意外。我运行了内存测试,结果全部完美通过。这台电脑在 8GB 内存下运行得非常棒。
BIOS 谜题
The BIOS Mystery
Then, I tried to enter the BIOS setup by pressing F2 at startup when the eMachines splash screen came up:
然后,我尝试在开机看到 eMachines 闪屏时按下 F2 键进入 BIOS 设置:

The screen went black, and then just sat there with a flashing white cursor in the upper-left corner. I wasn’t able to break it out of this hang with any special keystrokes. It was completely frozen. I could only get past it by rebooting. I figured that the only weird thing I had done was go past the maximum RAM requirements, so I tried putting in two 2 GB sticks instead. With only 4 GB of RAM installed, I was able to get into the Phoenix Award BIOS with no trouble.
屏幕变黑了,然后就停留在那里,左上角有一个闪烁的白色光标。我无法通过任何特殊的按键组合来打破这种卡死状态。它完全死机了。我只能通过重新启动来摆脱困境。我想我做过的唯一奇怪的事情就是超出了最大内存要求,于是我尝试改用两根 2GB 的内存条。只安装 4GB 内存时,我可以毫无问题地进入 Phoenix Award BIOS。
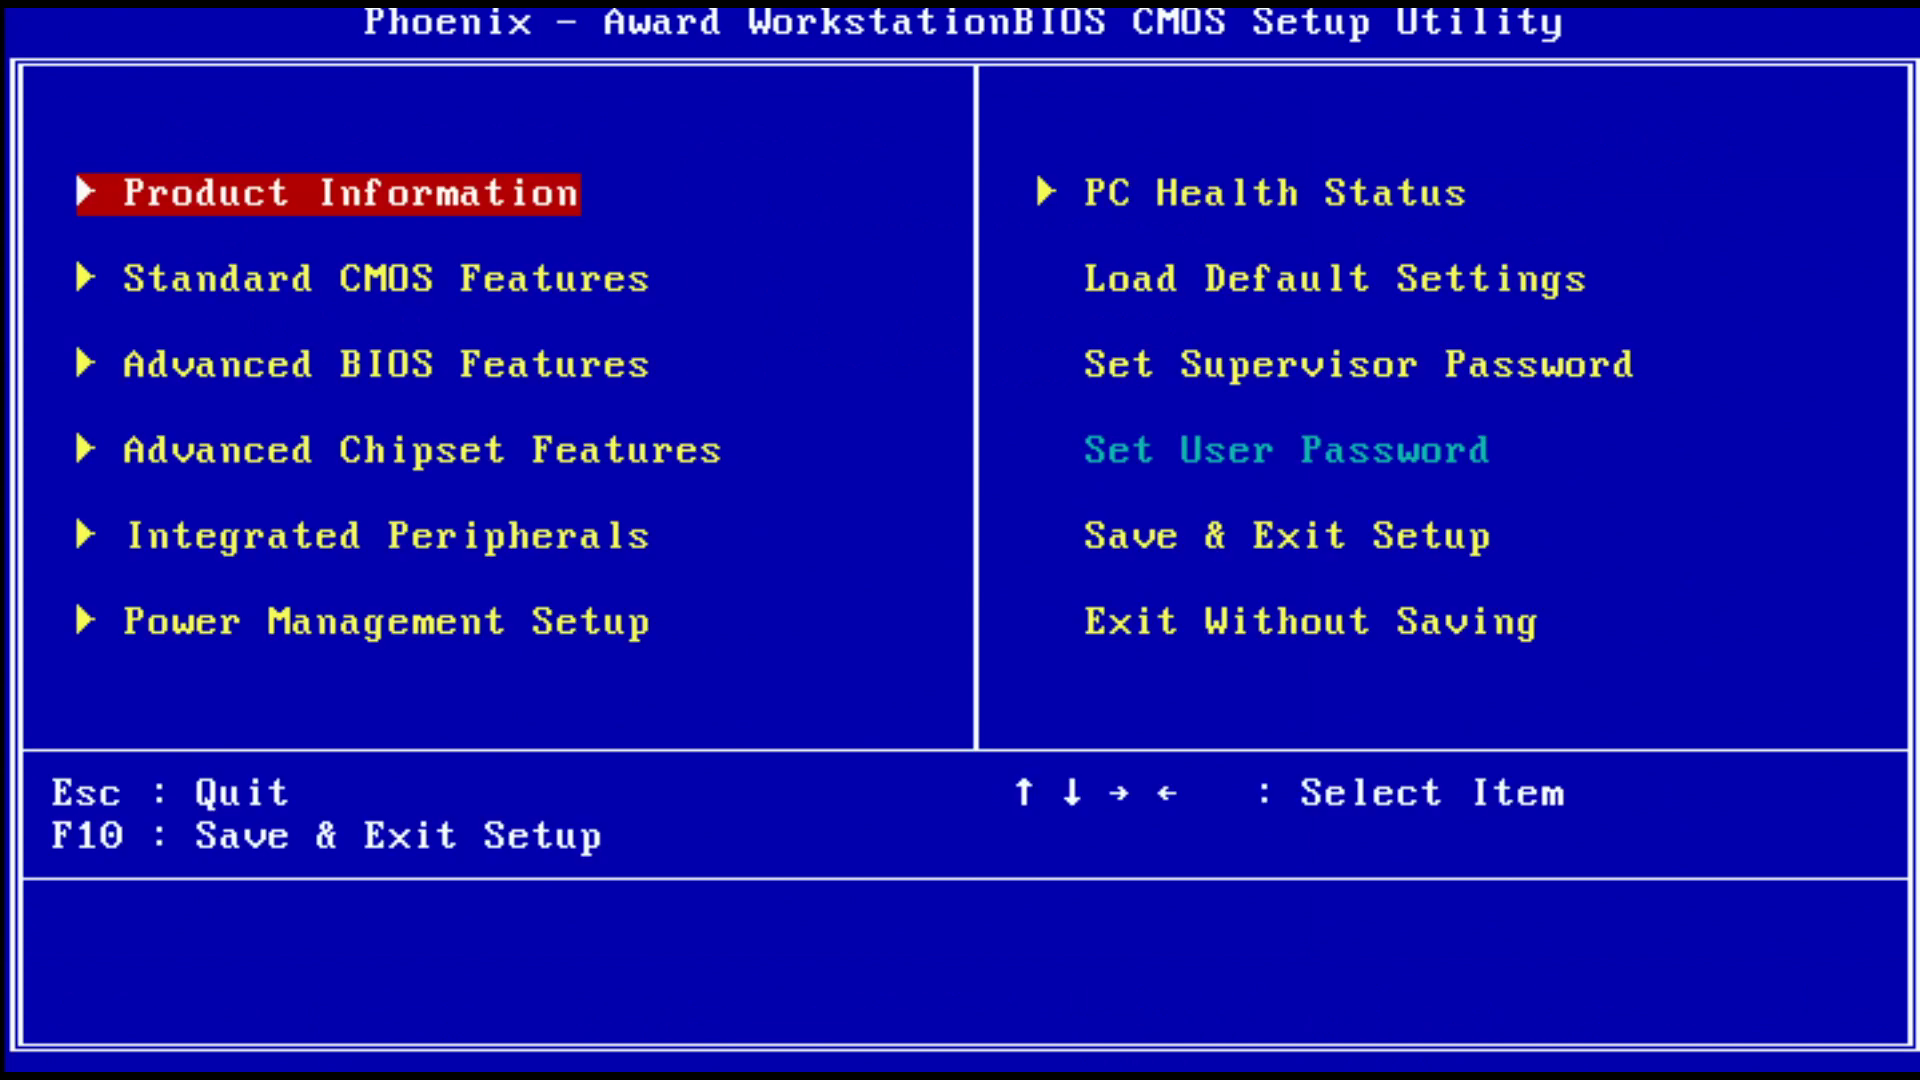
Very interesting! So the motherboard pretty much worked fine with 8 GB of RAM, but something caused it to fail to enter the BIOS with that much memory installed.
非常有趣!所以主板在插着 8GB 内存时几乎能完美工作,但某些原因导致在安装这么多内存时无法进入 BIOS。
I tried a few different BIOS updates I found online for this motherboard. None of them would allow me to enter the setup with 8 GB of RAM installed. I left it alone for a while, and then on a whim I thought I’d try some BIOS hacking. I used CBROM32 to integrate a newer AGESA that I extracted from a different motherboard’s BIOS. My hypothesis was maybe the AGESA in my BIOS was too old. Long story short, I somehow successfully managed to integrate the newer AGESA without bricking the board, but it didn’t change the 8 GB behavior at all.
我尝试了在网上找到的针对这款主板的一些不同的 BIOS 更新。它们无一例外都不允许我在安装 8GB 内存时进入设置。我放任不管了一段时间,后来心血来潮想尝试破解一下 BIOS。我使用 CBROM32 将从另一块主板的 BIOS 中提取的较新 AGESA 集成进去。我的假设是,也许我当前 BIOS 中的 AGESA 太老了。长话短说,我不知怎么地成功集成了较新的 AGESA 却没有把主板刷成砖,但这完全没有改变 8GB 内存时的表现。
That’s where I left this project in 2021. It’s been one of those things on my list of “hey, that would be cool to look into” ideas, but I just couldn’t bring myself to go into a crazy in-depth investigation to track down this particular bug. The older I get, the more exhausting it is to spend hours staring at assembly code. It’s hard on the eyes. Also, maybe I would have been more motivated to tinker with it if the motherboard had a socketed ROM chip I could easily swap in and out, but this one doesn’t. It’s a SOIC chip soldered on.
这就是我在 2021 年搁置这个项目时的状态。它一直是我清单上那种“嘿,研究一下这东西挺酷”的想法,但我就是无法说服自己去进行疯狂的深入调查来追踪这个特定的 Bug。年纪越大,花几个小时盯着汇编代码就越让人精疲力竭。这太伤眼睛了。另外,如果这块主板有一个我可以轻松插拔的插座式 ROM 芯片,我可能会更有动力去折腾它,但它没有。它是一个焊死在上面的 SOIC 芯片。
引入 AI:Claude Code 登场
Bringing in AI: Enter Claude Code
Fast forward to 2026. Agentic AI is moving forward at a blazing fast pace. I’ve had some success with fixing bugs and reverse-engineering things with Claude Code, so I thought this would be a great task to try throwing at it. Can Claude fix a BIOS bug?
快进到 2026 年。智能体 AI 正在以极快的速度向前发展。我曾使用 Claude Code 成功修复过一些 Bug 并做过逆向工程,所以我认为这是一个交给它尝试的绝佳任务。Claude 能修复 BIOS 漏洞吗?
I started with this prompt to Opus 5:
我给 Opus 5 发送了这样的提示词:
The .bin file is a BIOS dump from an eMachines EL1200. It officially supports 4 GB of RAM, but I put 8 in it and it still boots fine with 8. But…if I try to go into the BIOS setup it hangs unless I drop it back down to 4. Can you figure out why the BIOS setup hangs with 8 GB of RAM? It should be possible to fix.
.bin文件是来自 eMachines EL1200 的 BIOS 转储。它官方支持 4GB 内存,但我塞入了 8GB,它依然能完美引导启动。但是……如果我尝试进入 BIOS 设置,它就会卡死,除非我把内存降回 4GB。你能找出为什么 BIOS 设置在有 8GB 内存时会卡死吗?这应该是可以修复的。
A little over a half hour later, Claude spit back to me a write-up about the issue along with a patched BIOS image to try. It also corrected me by letting me know that the BIOS would still hang like this even if there was only a single 4 GB stick in it. The only working 4 GB configuration was two separate 2 GB sticks. I tested with a single 4 GB module and verified that it was totally right.
半个多小时后,Claude 回复了我一份关于该问题的报告以及一个修补过的 BIOS 镜像供我测试。它还纠正了我一个错误,告诉我即使里面只插了一根 4GB 内存条,BIOS 也会这样卡死。唯一能正常工作的 4GB 配置是两根单独的 2GB 内存条。我用单条 4GB 模块进行了测试,验证了它的说法完全正确。
I flashed it to the machine with flashrom:
我使用 flashrom 将其刷入机器:
$ sudo flashrom --programmer internal -w /tmp/newbios.bin
flashrom v0.9.9-r1954 on Linux 5.4.0-42-generic (x86_64)
flashrom is free software, get the source code at https://flashrom.org

Calibrating delay loop... OK.
DMI table is broken (bogus header)!
Found chipset "NVIDIA MCP61".
Enabling flash write... OK.
Found Macronix flash chip "MX25L8005/MX25L8006E/MX25L8008E/MX25V8005" (1024 kB, SPI) mapped at physical address 0x00000000fff00000.
Reading old flash chip contents... done.
Erasing and writing flash chip... Erase/write done.
Verifying flash... VERIFIED.
I rebooted, and…the new BIOS spit out by Claude completely bricked it. The CPU fan would turn on and then nothing. No monitor signal or anything.
我重启了机器,然后……Claude 生成的新 BIOS 彻底把它刷成砖了。CPU 风扇会转一下,然后就没动静了。没有任何显示器信号或其他反应。
迭代与恢复
Iteration and Recovery
Sweet. Was this whole experiment worthless? I can imagine the blog post title now. “Claude turned my computer into a fancy paperweight.” Did I just prove that AI is garbage? Not really. It’s all part of how AI is best used for tasks: give it a feedback loop and let it iterate. I told it what happened, and 6 minutes later it realized the mistake: it had shifted the location of a few modules (MEMINIT.BIN, HT.DLL, HT32GATE.BIN) that aren’t supposed to be moved around on the flash chip, at least not without updating some pointers. When it was patching the bug, it didn’t re-compress the section it patched; it just shifted everything after it out of the way to make room for an uncompressed version instead. This was what completely broke it.
太棒了。整个实验毫无价值吗?我已经能想象出这篇博客文章的标题了:“Claude 把我的电脑变成了一个漂亮的镇纸”。我刚刚证明了 AI 是垃圾吗?其实不然。这正是 AI 最适合执行任务的方式:给它一个反馈循环,让它不断迭代。我把发生的情况告诉了它,6 分钟后它意识到了错误:它移动了一些不应该在闪存芯片上随意移动的模块位置(
MEMINIT.BIN、HT.DLL、HT32GATE.BIN),至少在没有更新某些指针的情况下不能移动。当它修补 Bug 时,它并没有重新压缩被修补的段;它只是把后面的所有内容往后挪,腾出空间来存放未压缩的版本。这就是彻底搞砸的原因。
It offered to figure out how to compress the patched section and ensure those other modules wouldn’t be shifted around. I told it to go for it. 10 minutes later, it had written its own LH5 compressor and spit out a new BIOS image to test.
它主动提出要弄清楚如何压缩修补后的部分,并确保那些其他模块不会被移位。我告诉它放手去干。10 分钟后,它自己写了一个 LH5 压缩器,并吐出了一个新的 BIOS 镜像供测试。
This time around, I asked it to do more review and testing of its work, because I knew it would be difficult to keep recovering the BIOS after a brick. It didn’t find anything wrong during review, but the process it followed was kind of fun to follow along with. It wrote a very simple x86 interpreter in Python, tested the routine that it patched to make sure it no longer crashed with 8 GB of RAM, and then tested its new compressed module against the BIOS’s own decompressor code to make sure it was compatible. With that, I was ready for a re-test.
这一次,我要求它对其工作进行更多的审查和测试,因为我知道如果再次变砖,要持续恢复 BIOS 将会非常困难。它在审查期间没有发现任何问题,但它所遵循的过程看下来挺有意思。它用 Python 编写了一个非常简单的 x86 解释器,测试了它修补的代码例程,以确保它在 8GB 内存下不再崩溃,然后用它崭新的压缩模块与 BIOS 自身的解压代码进行测试以确保兼容性。有了这些,我准备好进行重新测试了。
First, I had to unbrick the motherboard. That ended up being a little more difficult than I had hoped, but it was manageable. Unlike my last experiment with flashing a BIOS using a SOIC clip, this one didn’t work with the chip mounted directly on the board. My trusty CH341A programmer just wouldn’t detect the chip. It also kept cutting out and disconnecting and reconnecting. It was acting like it was being asked to supply too much current.
首先,我得把主板救砖。结果证明这比我预期的要困难一些,但还在可控范围内。与我上次使用 SOIC 夹子刷 BIOS 的实验不同,这次直接把芯片焊在板子上进行夹持行不通。我信赖的 CH341A 编程器就是检测不到芯片。它还不断断开连接又重新连接。它的表现就像是被要求提供过大的电流一样。
I ended up having to lift the flash chip’s VCC pin from the motherboard while heating it with my soldering iron. Then I stuck a piece of Kapton tape underneath to isolate it from the board. This is something you have to do occasionally if a motherboard doesn’t have something like a diode or transistor isolating the chip from its power rail. With that little tweak in place, the CH341A programmer recognized the chip and was able to flash it. I also could have just removed the entire chip with hot air instead, but it was really close to a bunch of plastic like the battery holder and a SATA connector.
我最终不得不一边用烙铁加热,一边把闪存芯片的 VCC 引脚从主板上挑起来。然后我在下面贴了一小片耐高温胶带(Kapton tape)将其与主板隔离。如果主板没有诸如二极管或三极管之类的元件将芯片与其供电轨隔离,你偶尔就得这么做。经过这个小调整后,CH341A 编程器识别出了芯片并成功进行了烧录。我本来也可以用热风枪直接把整颗芯片吹下来,但它离电池座和 SATA 接口等一堆塑料件太近了。
Anyway, I reflashed it with my original BIOS backup (to guarantee I would unbrick the computer), soldered the pin back down, booted it up successfully, and then flashed Claude’s second attempt to the board using flashrom.
无论如何,我先用最初的 BIOS 备份重新刷了一遍(以确保主板成功复活),把引脚重新焊回板上,成功开机,然后使用 flashrom 将 Claude 的第二次尝试成果刷入了主板。
成功!
Success!
After rebooting, it came up with the splash screen, so that was good news. I pressed F2 to enter Setup. And…it worked! I was able to see my 8 GB of RAM reported in the Standard CMOS Features subpage.
重启后,开机画面顺利出现,这是个好消息。我按下 F2 进入 Setup 设置。然后……成功了!我能够在“标准 CMOS 功能”(Standard CMOS Features)子页面中看到报告的 8GB 内存。
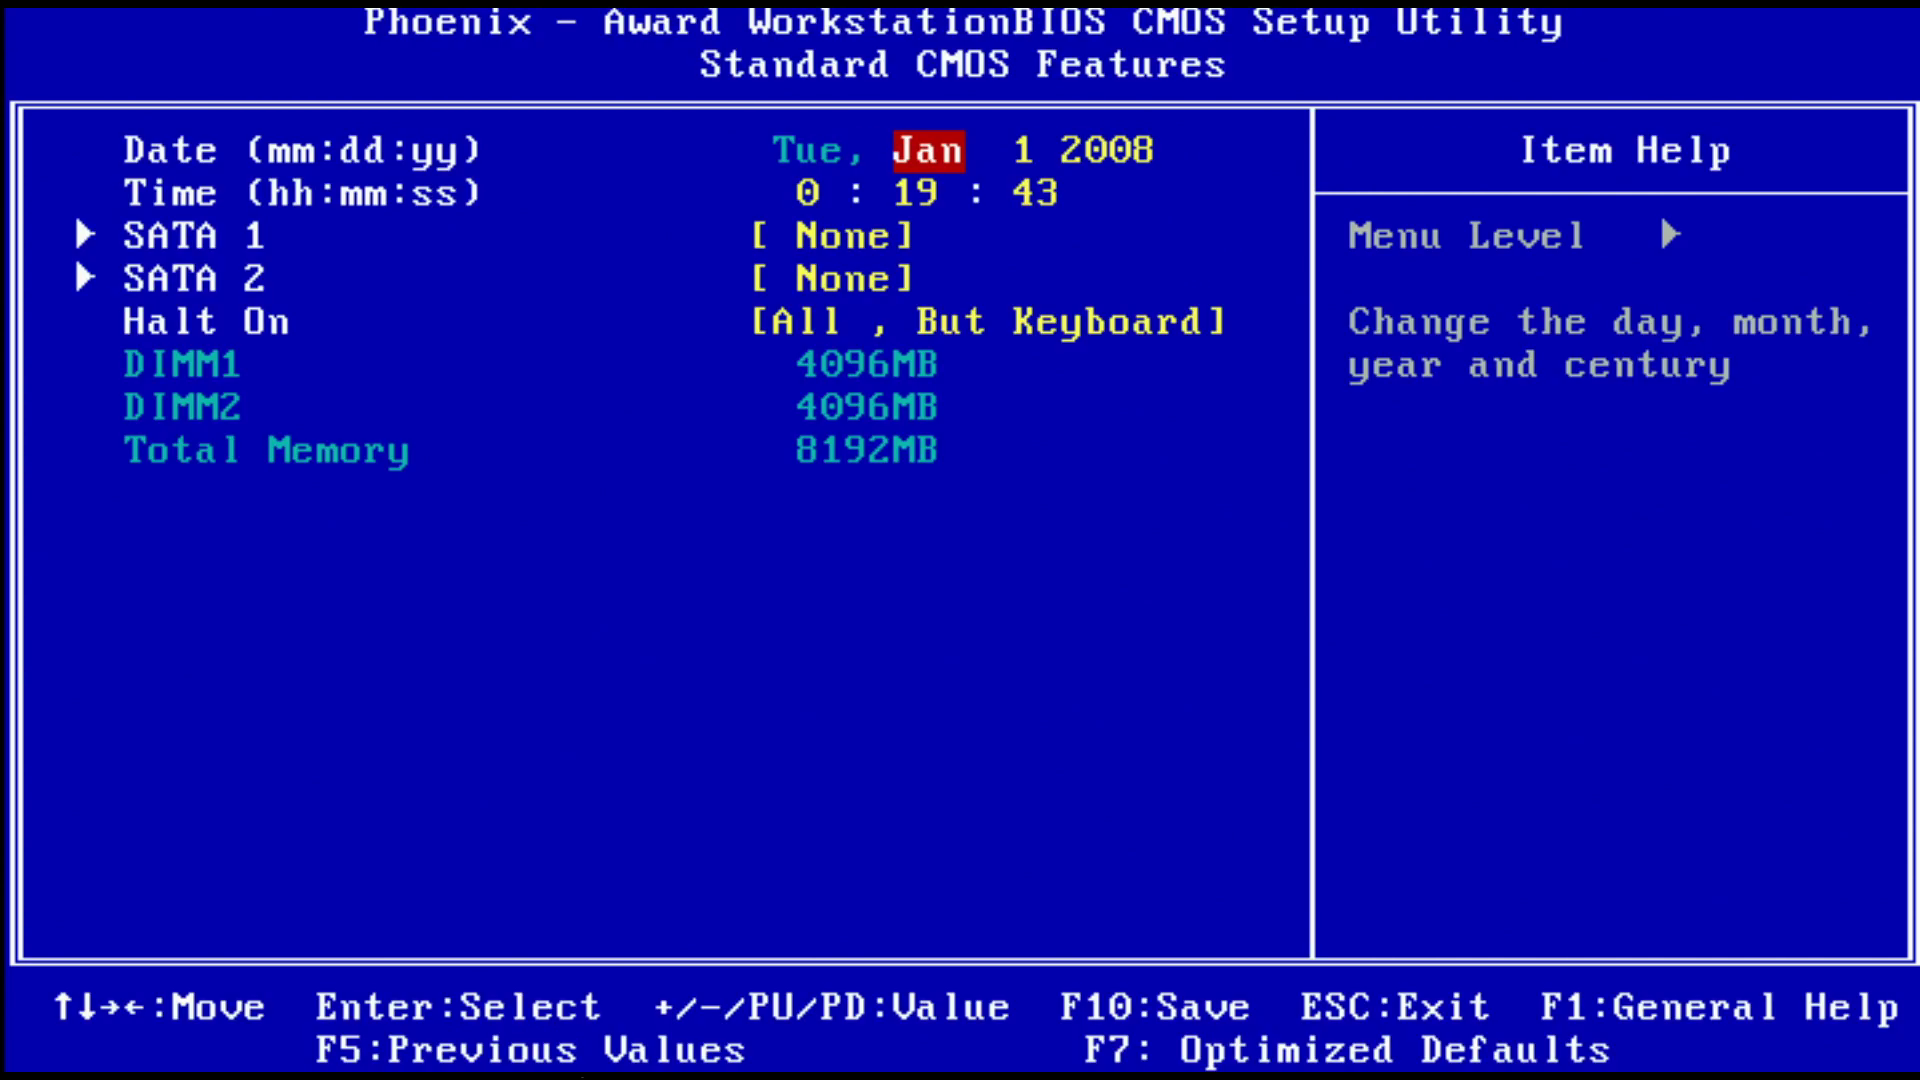
Claude successfully found and fixed the BIOS bug that had been crawling around in the back of my mind, occasionally bothering me for 7 years. With very little input from me, I might add.
Claude 成功找到了并修复了这个在我的脑海深处盘旋、断断续续折磨了我 7 年的 BIOS 漏洞。而且我得补充一句,我的干预极少。
漏洞剖析
Anatomy of the Bug
You might be wondering: what was the bug that it found, anyway?
你可能在想:它找到的那个 Bug 到底是什么?
The problem was in a small chunk of code in awardext.rom that is used for displaying the amount of memory on the Standard CMOS Features page depicted above:
问题出在
awardext.rom中的一小段代码中,该代码用于在上面描绘的标准 CMOS 功能页面上显示内存大小:
DIMM1                   4096MB
DIMM2                   4096MB
Total Memory            8192MB
The function’s purpose is to take the number of megabytes of RAM in each slot, and convert it to text drawn on the screen. Converting a number to text is a simple algorithm, which entails repeatedly dividing by 10 and looking at the remainder each time to determine digits to draw from right to left.
该功能的作用是获取每个插槽中 RAM 的兆字节数,并将其转换为屏幕上绘制的文本。将数字转换为文本是一个简单的算法,即重复除以 10 并在每次运算时查看余数,以确定从右到左绘制的数字。
The DIMM1 and DIMM2 lines were using an 8-bit divide instruction, which takes a value in the 16-bit register AX, divides it by an 8-bit value in another register, and puts the resulting quotient and remainder into AX’s 8-bit halves AL and AH, respectively. This means the quotient needs to fit inside of 8 bits. The first divide to get the last digit, if you have a 2 GB stick installed, is 2048/10 = quotient 204, remainder 8. 204 fits in 8 bits, so there’s no problem. On the other hand, if you have a 4 GB stick installed, it’s 4096/10 = quotient 409, remainder 6. 409 doesn’t fit in 8 bits. Here is some documentation about the DIV instruction, explaining that a #DE exception occurs if the quotient is too large to fit in the destination register. That’s what Claude correctly guessed was happening.
DIMM1 和 DIMM2 行使用的是 8 位除法指令:它取 16 位寄存器 AX 中的值,将其除以另一个寄存器中的 8 位值,并将得到的商和余数分别放入 AX 的两个 8 位半部分 AL 和 AH 中。这意味着商必须能够容纳在 8 位以内。为了获得最后一位数字而进行的第一次除法,如果你安装的是 2GB 内存条,则是 2048/10 = 商 204,余数 8。204 可以装入 8 位,所以没有问题。另一方面,如果你安装了 4GB 的内存条,则是 4096/10 = 商 409,余数 6。409 无法装入 8 位。这里有一些关于 DIV 指令的文档,解释了如果商太大而无法放入目标寄存器时会发生
#DE(除法错误)异常。这正是 Claude 准确猜测到正在发生的事情。
Astute readers may be thinking: but even with 2 GB sticks, the Total Memory line would be affected! The total is 4 GB! But nope, the Total Memory line was already using a 16-bit divide instruction that was immune to this problem. Claude’s fix was simply to patch the calculations for DIMM1 and DIMM2 to use the same 16-bit divide, being as clever and compact as possible so that it could be crammed into the same routine without shifting everything around to make room for it.
精明的读者可能会想:但是即使使用 2GB 内存条,总内存(Total Memory)行也会受影响啊!总数可是 4GB 呢!但事实并非如此,总内存行已经在使用 16 位除法指令,该指令对这个问题免疫。Claude 的修复方案很简单,就是修补 DIMM1 和 DIMM2 的计算过程,改用相同的 16 位除法,并尽可能巧妙、紧凑地编写,以便将其塞进相同的例程中,而无需为了腾出空间而移动所有其他东西。
So yeah, that’s the bug. I expected it to be something much deeper, but it was simple. An exception caused by a number-to-string conversion that wasn’t expected to handle large numbers. Interestingly enough, the main page doesn’t show the RAM totals at all, so it must have been arranging the text strings even before entering the Standard CMOS Features subpage.
所以,这就是那个 Bug。我原本以为会是什么更深层次的问题,但它却如此简单。一个由于数字转字符串转换未曾预期处理大数字而导致的异常。有趣的是,主页面根本不显示 RAM 总量,因此它肯定在进入“标准 CMOS 功能”子页面之前就已经在排布这些文本字符串了。
Some research reveals that it’s fairly common in the BIOS modding community to make patches to the awardext.rom module, although most of the Google results I found were for fixing a 64 GB hard drive size limit. It wouldn’t surprise me if one of the experts out there already knows all about this RAM bug. Nothing obvious showed up for me during searches about this bug.
一些研究表明,在 BIOS 修改社区中,对
awardext.rom模块进行修补相当常见,尽管我在谷歌上找到的大多数结果都是为了修复 64GB 硬盘大小限制。如果外面的某位专家对这个内存 Bug 了如指掌,我也不会感到惊讶。我在搜索这个 Bug 时并没有找到什么明显的相关讨论。
最终感想
Final Thoughts
Does this actually count as a project accomplished by me? Not really. I only gave it some simple guidance and tested what it told me to test. But regardless, this result is absolutely incredible and worth a writeup to tell the story. It fixed a freaking BIOS for me! It knew exactly where to look for the bug, found it, and patched it. It almost worked on the first try, but it made a very silly mistake that was correctable. In hindsight, the bug was very simple, but it still probably would have taken me weeks to figure out. It diagnosed the problem in a matter of minutes. Yes, it took longer than that because I had to be a human feedback loop, and it screwed something up the first time, but isn’t this amazing regardless? I am confident I never would have found the time to look into this myself. Too many project ideas, not enough time, and it’s so low on the priority list.
这真的能算作我完成的项目吗?算不上。我只是给它提供了一些简单的指导,并测试了它让我测试的东西。但无论如何,这个结果绝对令人难以置信,非常值得写一篇文章来讲述这个故事。它竟然帮我修复了一个 BIOS!它确切地知道去哪里找 Bug,找到了它并打上了补丁。它差点在第一次尝试时就成功了,但它犯了一个非常愚蠢且可纠正的错误。事后看来,这个 Bug 非常简单,但我自己可能还是需要花上几周时间才能弄清楚。而它在几分钟内就诊断出了问题。是的,由于我必须充当人工反馈循环,而且它第一次把事情搞砸了,这花了一点时间,但无论如何,这不是很神奇吗?我确信我自己绝对抽不出时间来研究这个。项目点子太多,时间太少,而且这在我的优先级列表里排得太靠后了。
I’m well aware that a faction of my readership will be upset about this post. How many gallons of water did I waste performing this experiment on what is essentially a scrap computer by today’s standards? Have I sold out to our new AI overlords? Not entirely. I wrote this entire post by hand using my own brain, as always. But I also believe that it’s important to open your mind, experiment, push the limits, and find out what is possible with new technologies. My takeaway from all of this is that debugging and reverse engineering has never been so easily accessible as it is today. That’s kind of terrifying, but also pretty cool.
我很清楚,我的一些读者会对手这篇文章感到不快。用这台按今天的标准来看基本上是废铁的电脑做这个实验,我浪费了多少加仑的水?我是不是向我们崭新的 AI 主宰投降了?并非完全如此。像往常一样,这篇博文全是由我用自己的大脑亲手写出来的。但我也坚信,保持开放的心态、勇于实验、挑战极限并探索新技术的可能性至关重要。我从中得到的最大收获是:调试和逆向工程从未像今天这样触手可及。这有点让人感到恐惧,但也非常酷。